How to Make a Bamboo Fishing Rod: Step-by-Step DIY Guide 2026
Building your own bamboo fishing rod is one of the most rewarding projects any angler can take on. In this guide, you’ll learn how to select the right bamboo, cure and straighten it, shape the blank, and finish a rod that performs beautifully on the water. Whether you’re a seasoned crafter or a curious beginner, this step-by-step walkthrough will give you everything you need to create a custom rod you’ll be proud to fish with.
There’s something deeply satisfying about catching a fish on a rod you built with your own hands. A handmade bamboo fishing rod isn’t just a tool — it’s a piece of functional art that connects you to centuries of angling tradition. Bamboo rods have been prized since the mid-1800s for their smooth, progressive action and incredible sensitivity. And while you can spend thousands on a custom rod from a master builder, making one yourself is absolutely within reach if you’re willing to invest time, patience, and a little elbow grease.
This guide will walk you through the entire process from start to finish. We’ll cover selecting bamboo, curing and heat treating, splitting and planing strips, gluing the blank, installing hardware, wrapping guides, and applying a beautiful finish. You don’t need a fancy workshop — just some basic tools, a workspace you can dedicate to the project, and a willingness to learn. Let’s get started.
- Select the right bamboo species: Tonkin cane (Pseudosasa amabilis) is the gold standard for bamboo fly rods due to its high fiber density, straightness, and natural taper.
- Proper curing and heat treating are essential: Bamboo must be dried slowly and then heat-treated to harden the fibers, improve resilience, and develop a beautiful golden-to-honey color.
- Split and plan strips precisely: Each culm is split into strips that are planed into precise triangular tapers — this is where the rod’s action and performance are determined.
- Gluing and wrapping require patience: Strips are glued together into a hexagonal (or square) blank, then wrapped with thread at stress points to prevent splitting under load.
- Finishing protects and beautifies: Multiple coats of varnish or epoxy seal the bamboo, protect against moisture, and give the rod a professional, polished look.
- Guide placement affects casting: Correctly spacing and aligning your rod guides is critical for smooth line flow and optimal casting performance.
- The project takes time and practice: Expect your first rod to take 40–80 hours over several weeks — the learning curve is steep but deeply satisfying.
📑 Table of Contents
- Understanding Bamboo as a Rod-Building Material
- Tools and Materials You’ll Need
- Step 1: Selecting and Preparing Your Bamboo
- Step 2: Splitting and Roughing Out Strips
- Step 3: Planing the Strips to Precision
- Step 4: Gluing the Blank
- Step 5: Installing the Grip, Reel Seat, and Ferrules
- Step 6: Guide Placement and Wrapping
- Step 7: Applying the Finish
- Step 8: Final Assembly and Testing
- Common Mistakes and How to Avoid Them
- Maintaining Your Bamboo Fishing Rod
- Conclusion
Understanding Bamboo as a Rod-Building Material
Before you pick up a single tool, it helps to understand why bamboo makes such an extraordinary fishing rod. Bamboo is technically a grass, but its structural properties rival many hardwoods. The long, dense fibers running along the length of the culm (the bamboo pole itself) give it remarkable tensile strength and natural flexibility.
Why Tonkin Cane Is the Gold Standard
Not all bamboo is created equal. For rod building, Tonkin cane (Pseudosasa amabilis) is the undisputed champion. It grows in a small region of Guangdong Province in China and has been the preferred material for bamboo rod makers for over 150 years. Here’s why:
- High fiber density: Tonkin cane has more fibers per square inch than almost any other bamboo species, giving it superior strength and resilience.
- Straight culms: The natural growth habit produces long, straight sections with minimal nodes, which is ideal for rod blanks.
- Natural taper: The culms taper gradually from base to tip, mirroring the taper you want in a finished rod.
- Consistent wall thickness: Tonkin cane has relatively uniform walls, making it easier to plane precise strips.
- Beautiful color: When heat-treated, Tonkin cane develops a warm golden-to-amber hue that’s simply stunning.
You can purchase Tonkin cane from specialty suppliers online. Expect to pay anywhere from $50 to $200+ per culm, depending on quality and length. For your first rod, buy at least two culms so you have backup material.
Other Bamboo Species Worth Considering
While Tonkin cane is ideal, other species can work for practice rods or different styles of fishing:
- Moso bamboo: Larger diameter, good for heavier rods or tenkara-style poles.
- Madake (Phyllostachys bambusoides): A Japanese species used in traditional tenkara rods.
- Guadua angustifolia: A South American species with excellent strength, sometimes used for heavier freshwater rods.
For your first build, stick with Tonkin cane. It’s the most forgiving and produces the best results.
Tools and Materials You’ll Need
Building a bamboo rod doesn’t require a professional workshop, but you do need some specific tools. Here’s a comprehensive list:
Essential Tools
- Planing form: A precision metal jig with a V-shaped groove that lets you plane bamboo strips to exact tapers. This is the single most important tool. You can buy one from rod-building suppliers or make your own from steel or aluminum bar stock.
- Block plane or miniature plane: A small, sharp plane for removing material from bamboo strips. A #3 or #4 block plane works well.
- Digital calipers: For measuring strip dimensions to the thousandth of an inch. Precision matters enormously here.
- Heat gun or propane torch: For heat-treating bamboo strips to harden fibers and develop color.
- Glue: Slow-cure epoxy (like System Three T-88 or URAC 185) is the standard for bamboo rod building.
- Binding thread or clamps: To hold strips together while the glue cures. Many builders use a rod-wrapping machine or simple spring clamps.
- Rod wrapping jig: A simple device that rotates the rod while you wrap thread around it. You can build one from a modified lathe or even a hand drill mounted in a vise.
- Fine-tooth saw: For cutting bamboo and trimming strips.
- Sandpaper (various grits): 120, 220, 320, 400, and 600 grit for shaping and finishing.
Hardware and Supplies
- Rod guides: Snake guides or single-foot guides in sizes appropriate for your rod length and line weight.
- Tip top: The small guide at the very tip of the rod.
- Reel seat: An aluminum or nickel-silver reel seat that fits your desired reel.
- Cork grips: Pre-shaped cork rings that you stack and shape into a grip.
- Thread: Silk or nylon rod-wrapping thread in your chosen color(s).
- Varnish or epoxy finish: Marine-grade spar varnish or color-preserving epoxy for the final finish.
- Color preserver: A thin acrylic coating applied to thread wraps before varnish to keep the thread color bright.
If you’re new to the craft, consider purchasing a rod-building kit from suppliers like Golden Witch, Bellinger, or Ed Schriver. These kits include pre-cut bamboo strips, hardware, and instructions that simplify the process significantly.
Step 1: Selecting and Preparing Your Bamboo
The quality of your finished rod starts with the quality of your raw bamboo. Take your time at this stage — it’s the foundation of everything that follows.
Choosing the Right Culm
When selecting Tonkin cane culms, look for these qualities:
- Straightness: Hold the culm at eye level and sight down its length. The straighter, the better. A slight curve can be straightened during heat treating, but severe bends are problematic.
- Diameter: For a standard 7- to 8-foot fly rod, you’ll want culms with a base diameter of at least 1.25 to 1.5 inches.
- Wall thickness: Thicker walls give you more material to work with. Look for walls at least 3/16 inch thick at the base.
- Node spacing: Wider spacing between nodes means longer usable sections. Nodes are harder to work around and create weak points.
- Color and condition: Fresh-cut bamboo is green. You want cane that has been air-dried for at least 6–12 months and has turned a pale yellow or straw color. Avoid canes with cracks, insect damage, or dark stains.
Curing and Drying
If your bamboo isn’t already cured, you’ll need to dry it slowly to prevent cracking. Here’s the process:
- Store the culms in a dry, shaded area with good air circulation.
- Stand them vertically or hang them horizontally with support every few feet.
- Allow 6–12 months for thorough drying. Rushing this step leads to cracked strips later.
- Check moisture content periodically — properly cured bamboo will feel light and produce a clear “clunk” when tapped.
Heat Treating
Heat treating is a critical step that hardens the bamboo fibers, drives out residual moisture, and develops that gorgeous golden color. Here’s how to do it:
- Work outdoors or in a well-ventilated area.
- Hold the bamboo strip over a propane torch or heat gun, moving it slowly back and forth.
- Apply heat evenly along the entire length. The bamboo will start to sweat — tiny beads of resin will appear on the surface.
- As you heat, the color will change from pale yellow to deep gold to rich amber. Stop when you reach your desired color.
- While the bamboo is still warm, gently straighten any curves by hand or with a simple jig.
- Allow the strips to cool completely before handling.
Quick Tip: Don’t overheat! Too much heat will scorch the bamboo and weaken the fibers. A steady, moderate heat applied evenly is the key. Practice on scrap pieces first.
Step 2: Splitting and Roughing Out Strips
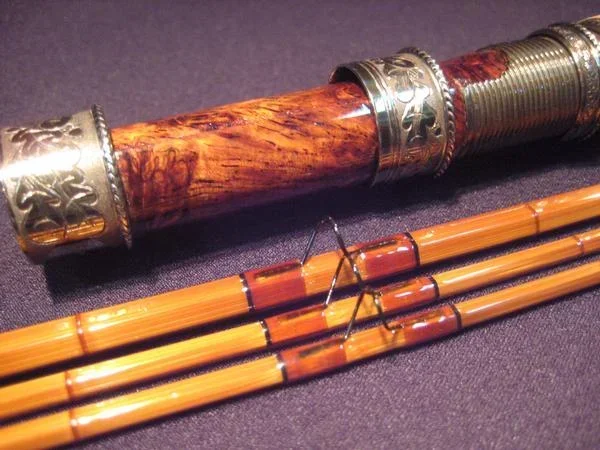
Visual guide about handmade bamboo fishing rod
Image source: southcreekltd.com
Now comes the part where your bamboo culm becomes rod material. A traditional bamboo fly rod blank is made from six triangular strips glued together to form a hexagonal cross-section. Some builders use four strips (square cross-section) or eight strips (octagonal), but hexagonal is the classic.
Splitting the Culm
- Cut the culm into sections between nodes, each section being slightly longer than your intended rod length (you’ll trim later).
- Split each section in half lengthwise using a sharp knife or chisel, starting at one end and working carefully along the grain.
- Continue splitting each half into thirds, giving you six strips per culm section.
- Remove the soft inner pith (the spongy material on the inside of the culm) using a scraper or knife. You want to keep only the dense outer wall — this is where the strength is.
- Rough-shape each strip with a plane or spokeshave, removing excess material and getting close to your target dimensions.
Understanding Rod Taper
The rod taper is the heart of your rod’s performance. It describes how the rod’s diameter changes from the butt (thick end) to the tip (thin end). A well-designed taper determines:
- Action: How the rod bends — fast action (bends mostly in the top third), medium action (bends through the middle), or slow action (bends throughout).
- Power: How much force the rod can generate — light, medium, or heavy.
- Casting feel: The responsiveness and feedback you feel when casting.
For your first rod, use an established taper from a proven design. Classic tapers like the Payne 98, Garrison 206, or Paul Young Para 15 are well-documented and produce excellent rods. You can find taper charts in books like “A Master’s Guide to Building a Bamboo Fly Rod” by Everett Garrison and Hoagy Carmichael, or from online rod-building communities.
Step 3: Planing the Strips to Precision
This is where patience and precision really pay off. Each of your six strips must be planed to an exact triangular cross-section with dimensions that change along the length according to your taper chart.
Setting Up Your Planing Form
A planing form is a metal bar with a precision-machined V-groove. The groove has a taper that matches your rod taper. You set the depth of the groove at each point along the rod using shims or an adjustable form, then plane the bamboo strip until it fits perfectly.
- Set your planing form to the correct depth for the butt end of the rod.
- Place a bamboo strip in the groove with the outer skin side facing up (this becomes the outside of the rod).
- Using your block plane, take thin, careful shavings from the strip.
- Check the dimension frequently with digital calipers.
- Move along the strip, adjusting the form depth at each station according to your taper chart.
- Repeat for all six strips.
Common Mistakes to Avoid
- Taking too much material at once: This can cause the strip to snap or create uneven surfaces. Take thin shavings and check often.
- Ignoring grain direction: Always plane with the grain, not against it. Planing against the grain tears the fibers and creates a rough surface.
- Rushing the process: A single strip can take 2–4 hours to plane correctly. Don’t rush it.
- Inconsistent measurements: Measure at every station along the strip. Even a few thousandths of an inch off will affect the rod’s action.
Expert Insight: Many experienced builders say that planing strips is 80% of the work in building a bamboo rod. The glue-up, wrapping, and finishing are relatively straightforward compared to the precision required here. Take your time and enjoy the meditative quality of the work.
Step 4: Gluing the Blank
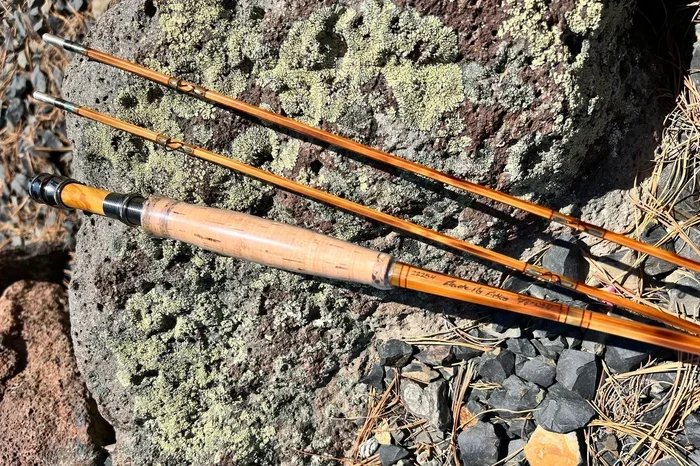
Visual guide about handmade bamboo fishing rod
Image source: images.squarespace-cdn.com
With all six strips planed to perfection, it’s time to assemble them into a rod blank. This is one of the most nerve-wracking steps — once the glue goes on, there’s no going back.
Preparing for the Glue-Up
- Lay out all six strips in order. Each strip has a specific position in the hexagonal cross-section.
- Test-fit the strips together without glue. They should fit snugly with no gaps.
- Prepare your glue according to the manufacturer’s instructions. Slow-cure epoxy gives you more working time.
- Set up your binding system — either a wrapping machine with rubber strips, or a system using thread and a rotating jig.
The Glue-Up Process
- Apply a thin, even layer of epoxy to the mating surfaces of each strip.
- Assemble the six strips into a hexagonal bundle.
- Starting from the butt end, begin wrapping with thread or applying rubber binding strips. Wrap tightly and evenly, spacing wraps about 1/4 inch apart.
- Work from the butt to the tip, keeping the strips aligned as you go.
- Check alignment frequently — the strips should not twist or shift.
- Allow the glue to cure fully. With slow-cure epoxy, this typically means 24 hours at room temperature.
- Remove the bindings carefully. Your blank should now be a solid hexagonal rod.
Shaping the Blank
After the glue cures, you’ll need to shape the hexagonal blank into a smooth rod:
- Use a plane or scraper to carefully remove the sharp edges where strips meet.
- Progress through sandpaper grits — 120, 220, 320, 400 — to create a smooth, round (or slightly faceted) surface.
- Check the taper at each station with calipers to ensure you haven’t removed too much material.
- The blank should feel smooth and even in your hands, with no flat spots or ridges.
Step 5: Installing the Grip, Reel Seat, and Ferrules
With your blank shaped and smooth, it’s time to add the functional components that make it a usable fishing rod.
Building the Cork Grip
-
- Stack pre-shaped cork rings onto a mandrel or the rod blank itself.
- Glue the rings together with contact cement or epoxy.
- Once cured, shape the grip using a lathe, hand sandpaper, or a simple turning setup. A cigar shape is classic for fly rods.
- Bore out the inside of the grip to fit snugly over the rod blank.
- Slide the grip onto the blank and secure it with epoxy.
Installing the Reel Seat
-
-
- The reel seat goes on the butt end of the rod. It’s typically a metal (aluminum or nickel-silver) fitting that holds your fly reel.
- You may need to build up the butt of the rod with thread or cork to match the reel seat’s inside diameter.
- Epoxy the reel seat in place, making sure it’s perfectly aligned with the rod.
- Allow the epoxy to cure fully before handling.
-
Adding Ferrules (for Multi-Piece Rods)
If you’re building a two-piece or three-piece rod, you’ll need ferrules — metal connectors that join the sections together:
-
-
- Cut the blank to the appropriate lengths for each section.
- Install male and female ferrules at the joint points. These are precision-machined metal fittings that fit together snugly.
- Epoxy the ferrules in place and allow to cure.
- Test the fit — ferrules should push together firmly and hold under tension but separate with a steady pull.
-
If you’re building a one-piece rod, you can skip this step entirely. Many bamboo rod builders prefer one-piece construction for its superior feel and fewer potential failure points.
Step 6: Guide Placement and Wrapping
Proper guide placement is critical for your rod’s casting performance. Guides that are too far apart, too close together, or misaligned will cause the line to slap against the rod, reduce casting distance, and create uneven stress distribution.
Determining Guide Spacing
-
-
- String the rod with fly line and flex it to find the natural bend pattern.
- Mark guide positions based on established spacing charts for your rod length and line weight. Most rod-building suppliers provide these charts.
- Common guide counts for a 7.5- to 8-foot fly rod range from 7 to 10 guides plus the tip top.
- The first guide (stripper guide) is typically placed 20–28 inches from the reel seat, with subsequent guides spaced progressively closer together toward the tip.
-
Wrapping Guides with Thread
-
-
- Attach the guide feet to the rod blank with a small drop of super glue to hold them in position.
- Using your rod-wrapping jig, wrap thread tightly and evenly over the guide feet.
- Start wrapping on one side of the guide and work to the other, creating neat, parallel wraps with no gaps or overlaps.
- Finish with a loop-and-pull technique to secure the thread end under the final wraps.
- Apply a thin coat of color preserver to the thread wraps to lock in the color.
-
For a deeper understanding of how guides and other components work together, check out our guide on fishing pole rod tips that covers essential rod anatomy and setup.
Step 7: Applying the Finish
The finish protects your bamboo from moisture, UV damage, and the general wear and tear of fishing. It also gives the rod its final, beautiful appearance.
Preparing for Finishing
-
-
- Ensure the blank is completely smooth and free of dust, fingerprints, and debris.
- Mask off the grip, reel seat, and ferrules with tape.
- Work in a clean, dust-free environment. Even tiny particles can mar the finish.
-
Applying Varnish or Epoxy
-
-
- Apply the first thin coat of marine spar varnish or rod finish epoxy using a small brush or by dipping the rod.
- Hang the rod vertically to dry, rotating it periodically to prevent drips and sags.
- Allow each coat to dry completely (typically 12–24 hours between coats).
- Lightly sand between coats with 400- or 600-grit sandpaper to promote adhesion.
- Apply 4–8 coats total, depending on the product and your desired level of protection.
- After the final coat, allow the rod to cure for at least one week before fishing.
-
Quick Tip: Many builders prefer a “dipped” finish for the smoothest results. This involves slowly lowering the rod into a tube of varnish and pulling it out at a controlled speed. It takes practice but produces a glass-like finish.
Step 8: Final Assembly and Testing
With the finish cured, it’s time to put everything together and test your creation.
Final Assembly Checklist
-
-
- Grip: Secure and comfortable in hand?
- Reel seat: Reel fits snugly and locks in place?
- Ferrules (if applicable): Sections join firmly and align straight?
- Guides: All aligned in a straight line along the rod?
- Tip top: Secure and properly sized for your fly line?
- Finish: Smooth, even, and free of bubbles or drips?
-
Test Casting
Take your new rod to a pond, lake, or even a large open field for its first cast:
-
-
- Attach your reel, string the fly line, and tie on a piece of yarn instead of a hook (for safety).
- Make a few gentle casts to get a feel for the rod’s action.
- Gradually increase casting distance and power.
- Pay attention to how the rod loads (bends) and recovers (straightens). A well-built bamboo rod will have a smooth, progressive action that feels alive in your hand.
- Listen for any creaking, cracking, or unusual sounds that might indicate a problem.
-
Congratulations — you’ve just built a bamboo fishing rod from scratch! The first fish you catch on it will be a moment you never forget.
Common Mistakes and How to Avoid Them
Even experienced builders make errors. Here are the most common pitfalls and how to sidestep them:
-
-
- Skipping the curing process: Green bamboo will crack and warp. Always use properly cured cane.
- Inaccurate planing: Invest in good calipers and check measurements constantly. A few thousandths of an inch makes a real difference.
- Using the wrong glue: Fast-setting super glue is too brittle. Use slow-cure epoxy designed for rod building.
- Uneven thread wraps: Practice on a dowel rod before wrapping your actual rod. Neat wraps are a sign of craftsmanship.
- Rushing the finish: Each coat needs full cure time. Impatience here leads to a soft, gummy finish that won’t protect the rod.
- Poor guide alignment: Use a straightedge or string line to ensure all guides are perfectly aligned before wrapping.
-
For more foundational advice that applies to all types of fishing, our best fishing tips for every angler covers essential knowledge that complements your rod-building journey.
Maintaining Your Bamboo Fishing Rod
A well-made bamboo rod can last generations with proper care. Here are some maintenance essentials:
-
-
- After each use: Wipe the rod dry with a soft cloth. Remove the reel and store the rod in a cool, dry place.
- Storage: Always store your rod in a protective tube or case. Never lean it in a corner where it can fall.
- Inspect regularly: Check for loose guides, cracked finish, or any signs of delamination (strips separating).
- Re-varnish as needed: Over years of use, the finish may wear thin. Lightly sand and apply a fresh coat to maintain protection.
- Avoid extreme temperatures: Don’t leave your rod in a hot car or exposed to freezing conditions for extended periods.
-
Conclusion
Building a bamboo fishing rod is one of the most fulfilling projects in the fishing world. It connects you to a tradition that stretches back over a century, teaches you patience and precision, and results in a tool that’s uniquely yours. From selecting the perfect Tonkin cane culm to applying that final coat of varnish, every step is an exercise in craftsmanship.
Your first rod won’t be perfect — and that’s okay. Each rod you build will be better than the last as you refine your technique and develop your feel for the material. The bamboo rod-building community is welcoming and generous with knowledge, so don’t hesitate to reach out to fellow builders for advice and encouragement.
Now go find some bamboo, sharpen your plane, and start building. The fish are waiting.
Frequently Asked Questions
How long does it take to build a bamboo fishing rod?
A first-time builder should expect to spend 40–80 hours spread over several weeks. The planing and glue-up stages are the most time-consuming. Experienced builders can complete a rod in 20–30 hours, but don’t rush the process — patience is the key to a quality rod.
What type of bamboo is best for making fishing rods?
Tonkin cane (Pseudosasa amabilis) is the best bamboo for rod building. It has the highest fiber density, straightest culms, and most consistent wall thickness of any bamboo species. It’s been the standard material for bamboo fly rods since the 1800s and is available from specialty rod-building suppliers.
Can I make a bamboo fishing rod without expensive tools?
Yes, you can build a functional bamboo rod with basic hand tools — a sharp plane, sandpaper, a heat gun, and clamps. However, a planing form is highly recommended for achieving precise tapers. Many builders start with a pre-cut rod-building kit that includes strips already planed to the correct dimensions, which eliminates the need for a planing form entirely.
How much does it cost to build a bamboo fishing rod?
A basic DIY bamboo rod can be built for $150–$400 in materials, depending on the quality of your bamboo, hardware, and finish. Tonkin cane culms cost $50–$200 each, and a full hardware kit (guides, reel seat, ferrules, cork) runs $50–$150. This is significantly less than a custom bamboo rod from a professional builder, which can cost $2,000–$10,000 or more.
Is a bamboo fishing rod better than a graphite rod?
It depends on what you value. Bamboo rods offer a uniquely smooth, slow-to-medium action that many anglers find more enjoyable for short to medium-distance casting. They’re also beautiful, traditional, and deeply satisfying to own. However, graphite rods are lighter, more durable, more consistent, and far less expensive. Many anglers own both and choose based on the fishing situation and their mood.
Do I need experience in woodworking to build a bamboo rod?
No prior woodworking experience is required, but basic hand-tool skills are helpful. The most important qualities are patience, attention to detail, and a willingness to learn. If you can measure accurately, work carefully, and follow instructions, you can build a bamboo rod. Many successful builders started with zero experience and learned entirely through online resources, books, and rod-building forums.