How to Attach a Sinker to a Fishing Line Easily
Knowing how to attach a sinker to a fishing line correctly is essential for a successful day on the water. Whether you’re a beginner or a seasoned angler, this guide covers the easiest and most reliable knots and rigs: the clinch knot, split shot, egg sinker, and more. Master these techniques, and you’ll cast farther, feel more bites, and lose fewer rigs.
Fishing is one of those hobbies where the smallest details make the biggest difference. You can have the perfect rod, a top-notch reel, and the tastiest bait – but if your sinker isn’t attached correctly, your presentation will be off, and the fish will know something’s wrong.
Learning how to attach a sinker to a fishing line isn’t complicated, but there’s more than one way to do it. Some methods let your sinker slide freely, others lock it in place. Some are perfect for rivers, others for still lakes. In this guide, I’ll walk you through the five most common techniques, from the simple split shot to the sturdy clinch knot for pyramid sinkers.
I’ll also share quick tips to avoid common mistakes, like using the wrong knot for the sinker shape or forgetting to add a swivel. By the end, you’ll know exactly which method works best for your fishing style. Let’s dive in.
Key Takeaways
- Two main styles: You can either tie a sinker directly (fixed) or let it slide (sliding/egg sinker). Each suits different fishing scenarios.
- The clinch knot is universal: The improved clinch knot works for most sinkers with a hole or eyelet – it’s strong, simple, and quick to tie.
- Split shot is the easiest for small adjustments: Simply pinch a split shot onto your line without any knot. Perfect for light tackle and live bait.
- Sliding sinkers (egg or bullet) need a swivel: Use a barrel swivel to stop the sinker from sliding down to your hook. This setup is great for bottom fishing.
- Pyramid and bank sinkers require a leader: For heavy surf or current, attach a pyramid sinker to a separate leader using a clinch knot, then connect to your main line with a swivel.
- Material matters: Lead is traditional, but tungsten and steel are safer for the environment and often more durable. Check local regulations.
- Practice makes perfect: The best sinker attachment is one you can tie quickly and confidently. Practice these knots at home before your fishing trip.
📑 Table of Contents
- Why Attaching a Sinker Correctly Matters
- The Simple Split Shot Sinker (No Knot Needed)
- The Improved Clinch Knot for Sinkers with Holes
- Sliding Sinkers (Egg and Bullet) – The Swivel Method
- Pyramid and Bank Sinkers – The Leader Approach
- Dropper Loop and Other Specialty Rigs
- Quick Comparison Table of Sinker Attachment Methods
- Common Mistakes When Attaching a Sinker
- How to Choose the Right Sinker for Your Fishing
- Expert Insight: The “Nail Knot” Alternative
- Conclusion
Why Attaching a Sinker Correctly Matters
A sinker does two things: it helps you cast farther and takes your bait down to where the fish are. But if it’s attached wrong, you’ll either lose the sinker on the first cast (goodbye, tackle) or create a weird twist in your line that spooks fish.
When you attach a sinker properly, your bait behaves naturally. The sinker doesn’t slide too far, your line doesn’t get tangled, and you can feel the bottom through the line. Plus, how to set up a fishing rod is closely related – the sinker is one piece of a bigger puzzle. A good setup starts with a strong, tangle-free sinker attachment.
The Simple Split Shot Sinker (No Knot Needed)
If you’re after panfish, trout, or bluegill, the split shot sinker is your best friend. These tiny round weights have a slit that you simply pinch onto your line.
How to Attach a Split Shot Sinker
- Hold the split shot between your thumb and index finger, with the slit facing the line.
- Place the line into the slit so it sits in the middle of the weight.
- Use split shot pliers (or your teeth if you’re tough) to close the weight around the line. Squeeze firmly but don’t crush it – you don’t want to damage the line.
That’s it. No knot, no hassle. But there are a few crucial details:
- Always pinch the split shot closed completely – if it’s loose, it will slide and ruin your depth control.
- Use multiple split shots spaced a few inches apart for a slower, more natural fall.
- Remove split shots carefully – never reuse a split shot that’s been pinched open, as it can weaken the line.
Split shots are great for how to set up a fishing rod for trout because they’re lightweight and easy to adjust. You can add or remove them in seconds.
A Quick Tip for Split Shots
Use a split shot tool – these small pliers have a notch that helps you pinch the weight evenly. They prevent line damage and save your teeth. A simple tool costs a few dollars and lasts forever.
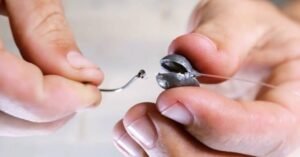
Image source: saltstrong.com
The Improved Clinch Knot for Sinkers with Holes
Many sinkers, especially egg sinkers, bullet sinkers, and some bank sinkers, have a small hole (eye) for the line. The improved clinch knot is the gold standard for attaching these.
Step-by-Step: Improved Clinch Knot
- Thread the line through the eye of the sinker. Leave about 6 inches of tag end.
- Wrap the tag end around the main line 5 to 7 times. Keep wraps tight and close together.
- Pass the tag end through the small loop just above the eye of the sinker.
- Then pass the tag end through the big loop you just created (this is the “improved” part).
- Wet the knot with saliva or water, then pull the tag end to tighten slowly. The wraps should stack neatly.
- Trim the tag end to about ¼ inch.
This knot works for both monofilament and fluorocarbon lines. It’s strong – nearly 100% line strength if tied correctly – and it won’t slip.
When to Use the Clinch Knot for Sinkers
- Fixed sinkers: If you want the sinker to stay in one place (like near a hook for bottom fishing), use a clinch knot directly to the sinker.
- Sliding sinkers with a stop: For a sliding egg sinker, you tie a clinch knot to a swivel or bead, not to the sinker itself. More on that in the next section.
Common mistake: Tying the clinch knot directly to an egg sinker without a stop. The sinker will slide over the knot and might slip off. Always use a swivel or bead to stop it.
Sliding Sinkers (Egg and Bullet) – The Swivel Method
Sliding sinkers are fantastic for letting fish take the bait without feeling the weight. They’re used in Carolina rig and fish finder rigs. The key is to allow the sinker to slide freely along the line while preventing it from sliding all the way down to the hook.
How to Set Up a Sliding Sinker
- String the main line through the sinker’s hole. For egg sinkers, that’s the whole weight – no knot needed on the sinker itself.
- Add a plastic bead if you like – it protects the knot from the sinker.
- Tie a barrel swivel to the end of the main line using a clinch knot or palomar knot.
- Attach your leader (a separate piece of line with a hook) to the other end of the swivel.
The swivel acts as a stop. The sinker can slide up and down the main line, but it can’t pass the swivel. This gives the fish a more natural feel: they can take the bait and move without picking up the weight.
Bullet Sinkers and the Texas Rig
Bullet sinkers are usually used with soft plastics (like worms). The setup is similar: slide the bullet sinker onto the line, then add a bead (optional), then tie a hook. For a Texas rig, the hook is weedless – the sinker slides and helps the bait penetrate cover. This is a popular technique for bass fishing. Fishing guides for beginners often recommend the Texas rig because it’s simple and effective.
Pyramid and Bank Sinkers – The Leader Approach
If you’re fishing from the surf or a boat in heavy current, you need a sinker that holds bottom. Pyramid sinkers (with a flat base) and bank sinkers (teardrop-shaped) dig into sand or mud. They come with a wire eyelet or a ring.
Attaching a Pyramid or Bank Sinker
- Cut a 12- to 18-inch leader of heavier monofilament (20-30 lb test).
- Tie one end of the leader to the sinker using a clinch knot through the eyelet.
- Tie the other end of the leader to a three-way swivel or a snap swivel.
- Connect your main line to the other eye of the three-way swivel, and a hook leader to the third eye.
Using a leader keeps the heavy sinker away from your main line, reducing tangles. The three-way swivel also allows your bait to ride above the bottom while the sinker stays anchored. This is a classic surf fishing rig.
Important Consideration: Breaking Strength
Your sinker leader should be weaker than your main line. That way, if your sinker gets snagged, the leader breaks instead of your main line. You only lose the sinker, not your whole rig. This is a smart safety measure.
Dropper Loop and Other Specialty Rigs
Sometimes you want the sinker below the hook, like in a high-low rig or for bait fishing in deep water. A dropper loop is a nifty knot that creates a loop sticking out from the line, to which you can attach a sinker.
How to Tie a Dropper Loop for a Sinker
- Double your line to form a loop of about 4 to 6 inches.
- Twist the loop 5 to 7 times.
- Pass the end of the loop through the hole in the middle of the twists.
- Pull the loop to tighten. This creates a small side loop.
- Attach a sinker to that loop (using a snap or knot).
The dropper loop is excellent for presenting multiple hooks at different depths. You can attach a sinker on a lower dropper loop, then hooks on higher loops. The sinker keeps the line vertical, and the baits float above.
Quick Comparison Table of Sinker Attachment Methods
| Method | Knot Required? | Best For | Pros | Cons |
|---|---|---|---|---|
| Split shot | No | Light tackle, panfish | Fast, adjustable, no knot | Can damage line if pinched too hard |
| Clinch knot direct | Yes | Fixed sinkers with eye | Strong, simple, works on any line | Sinker can’t slide; may twist line |
| Sliding egg (swivel) | Yes to swivel | Bottom fishing, live bait | Natural feel, reduces tangles | Requires swivel and leader |
| Pyramid/bank (leader) | Yes to leader | Surf, current, heavy bottom | Holds bottom well, breakaway leader | More components, bulkier |
| Dropper loop | Yes (loop knot) | Multi-hook rigs | Aligns bait above sinker | Requires practice to tie neatly |
Common Mistakes When Attaching a Sinker
Everybody makes mistakes when they’re learning. Here are the most frequent ones, so you can avoid them:
- Using too heavy a sinker: A heavy sinker can snap your line on the cast or scare fish. Match the weight to your rod rating and water conditions.
- Skipping the swivel: Without a swivel, your bobber or sinker can twist the line, causing tangles. Always use a barrel swivel when fishing a sliding sinker.
- Not wetting the knot: Heat from friction weakens the line. Always wet your knots before tightening.
- Reusing split shots: Once a split shot is pinched open, the metal can nick your line. Use fresh ones.
- Forgetting the bead: A bead between the sinker and swivel prevents the sinker from damaging the knot.
- Clipping the tag end too short: Leave at least ¼ inch – if the knot slips, the tag end might save it.
How to Choose the Right Sinker for Your Fishing
There’s no single “best” sinker. The choice depends on water depth, current, and target species. Here’s a quick guide:
- Still water (lakes, ponds): Use round or egg sinkers. They resist rolling and stay put.
- Moving water (rivers, surf): Use pyramid or bank sinkers. Their shape digs into the bottom.
- Weedy areas: Use a bullet sinker (slim shape) to slide through weeds.
- Light line, small fish: Split shots are perfect – they don’t weigh down the presentation.
Also consider the material. Lead is cheap but toxic. Many countries restrict lead sinkers. Tungsten is denser (smaller size for same weight) and eco-friendly. Steel and bismuth are alternatives. Always check local regulations – in some waters, only non-toxic sinkers are allowed.
Expert Insight: The “Nail Knot” Alternative
Some anglers prefer the nail knot for attaching a sinker to a leader, especially for fly fishing or very thin lines. It’s not common for conventional fishing, but it’s worth knowing. The nail knot creates a smooth profile that passes through guides easily. If you ever need to attach a sinker to a thin tippet, the nail knot is an option. However, for most everyday fishing, the clinch knot or split shot is simpler.
Conclusion
Mastering how to attach a sinker to a fishing line is one of those skills that transforms your fishing experience. It’s not just about keeping the weight on – it’s about making your bait look natural, feeling the bottom accurately, and not losing gear to tangles or snags.
We covered five main methods: split shot for quick adjustments, clinch knot for fixed sinkers, sliding egg sinkers with a swivel for natural bait presentations, bank/pyramid sinkers on a leader for heavy conditions, and dropper loops for multi-hook rigs. Each has its place, and now you know exactly when to use each.
Remember: practice these knots at home before your next trip. Tie them in different lighting, with wet hands, and with various line types. The more automatic the process becomes, the more time you’ll spend fishing instead of fiddling.
If you run into a snagged sinker, don’t pull too hard. Instead, point your rod at the snag and pull straight – often the sinker will bend, or the leader will break (if you used the breakaway tip). And if you’re traveling with your gear, learning how to fly with fishing rods can help you pack your tackle efficiently.
Now go grab your rod, tie on a sinker with confidence, and catch some fish!
Frequently Asked Questions
Can I use the same knot for both sinkers and hooks?
Yes, the improved clinch knot works for hooks and sinkers that have an eye. However, for sinkers, you often want a sliding setup, which requires a swivel. For hooks, the clinch knot is usually direct.
How do I prevent a sinker from sliding down to my hook?
For a sliding sinker, tie a barrel swivel below the sinker. The swivel acts as a stop. For a fixed sinker, use a clinch knot directly around the sinker’s eye – that won’t slide.
What’s the easiest sinker for a beginner?
Split shot sinkers are the easiest because you don’t need a knot. Just pinch them onto the line. They’re perfect for beginners fishing for panfish or bluegill.
How do I attach a pyramid sinker without a swivel?
You can tie a pyramid sinker directly to the main line using a clinch knot, but it’s not recommended. Without a swivel, the line can twist. Better to use a leader and a three-way swivel.
Do I need a leader for sinkers?
Not always. For split shots or small egg sinkers, you can attach directly to your main line. For heavy pyramid or bank sinkers in current, a leader (lighter line) prevents losing the whole rig if the sinker snags.
Can I reuse a split shot that I’ve already pinched open?
It’s not a good idea. Once a split shot is opened, the edges can become sharp and damage your line. Use fresh split shots for each trip – they’re cheap.